
3 posts tagged with "OData"

View All Tags

· 3 min read
Ravi Kant Sharma

Introduction

In this blog I will walk you through the process of connecting to your salesforce organization with your odata service.

Connect and configure your service in Salesforce External Data Source.

To be able to create and configure an external data source, you must Set up Salesforce Connect. This trail on Salesforce will walk you through the necessary steps.

Once you have installed the necessary packages into your Salesforce Organization, follow the steps below to configure your OData service inside Salesforce CRM.

Connect

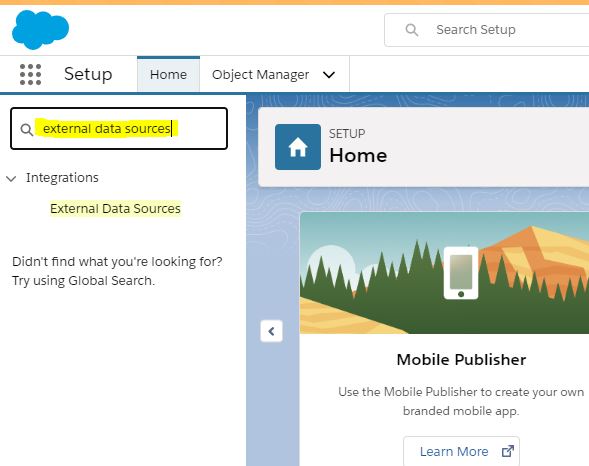
From Setup, type External Data Sources into the Quick Find box, then select External Data Sources.

Click New External Data Source.

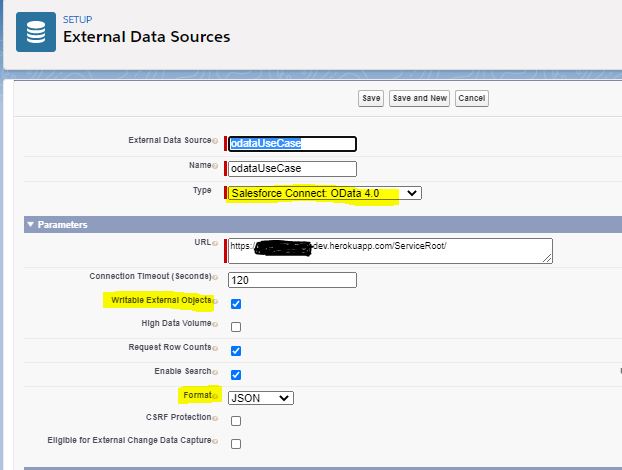
Enter a valid label for your external data source and then select Salesforce Connect: OData 4.0 as the type.

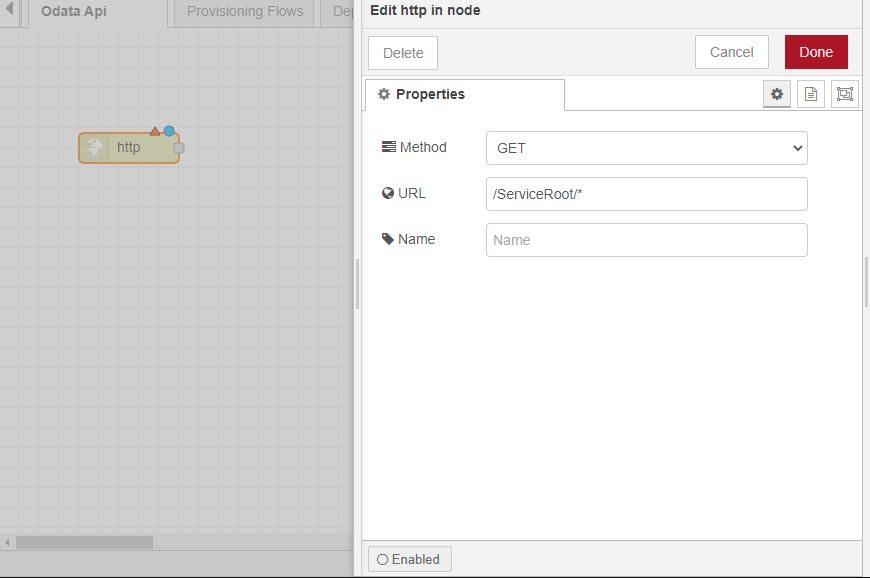
Now, provide your service URL with the endpoint in the URL field and click Save when you're done.

note

You should check the Writable External Object only when you have added http-in nodes with POST, PUT, PATCH, DELETE methods which enables Salesforce to write records to the database.

Phew! That was tricky, but stick to the steps because we're almost there.

Sync

Now that we have an external data source, we need to sync the tables/metadata to create objects inside of our Salesforce Organization. which can be easily done by clicking the "Validate and Sync button."

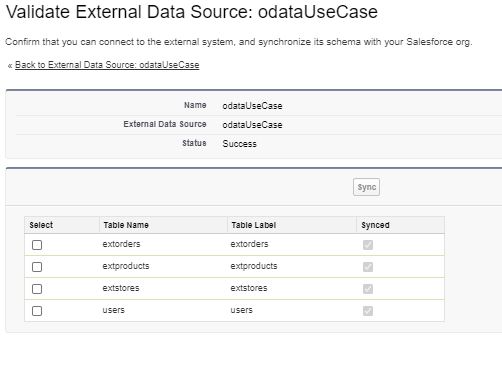
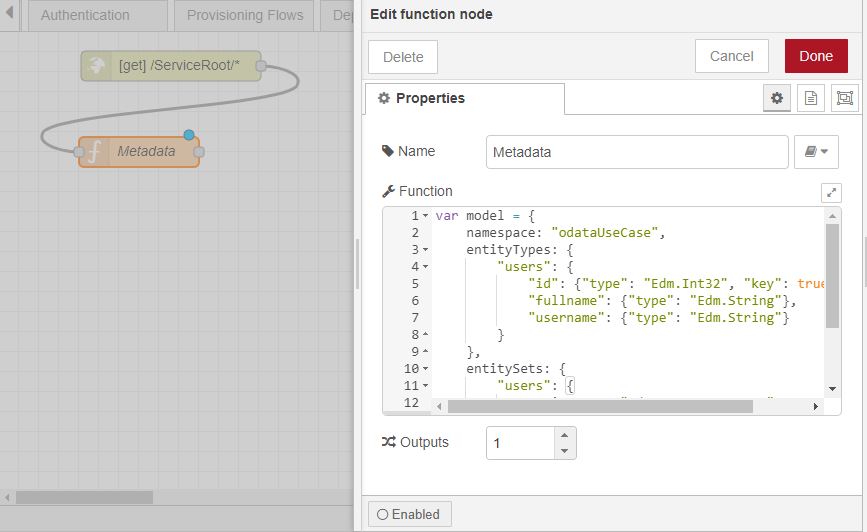
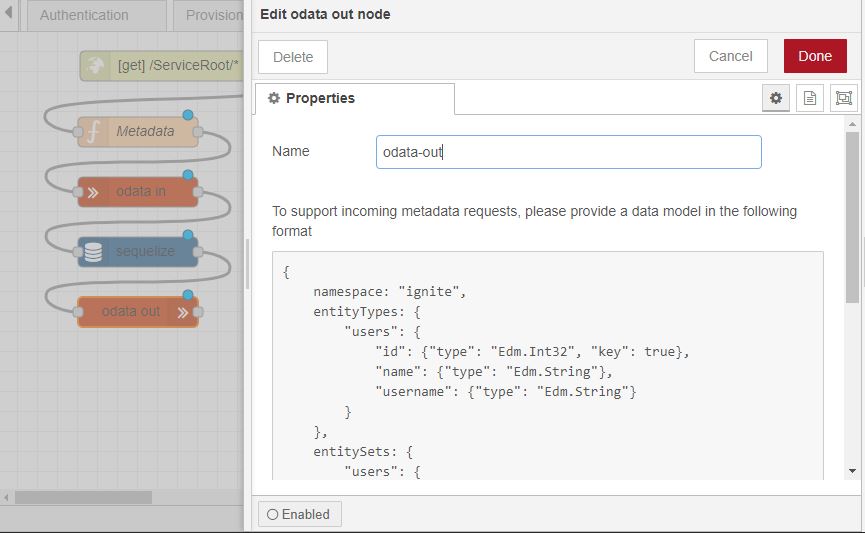
Remember the model we provided in step 1?

Here, you'll see a list of all the tables that you provided metadata for inside of the function node.

Check all the tables you want to sync with Salesforce and click the Sync button.

Have you done that? Well then congratulations! You've successfully added your OData service as an external data source inside your Organization.

Verify

To confirm if the objects have been created inside Salesforce, click the drop-down arrow next to the Object Manager, Here you'll see the tables that you just synced.

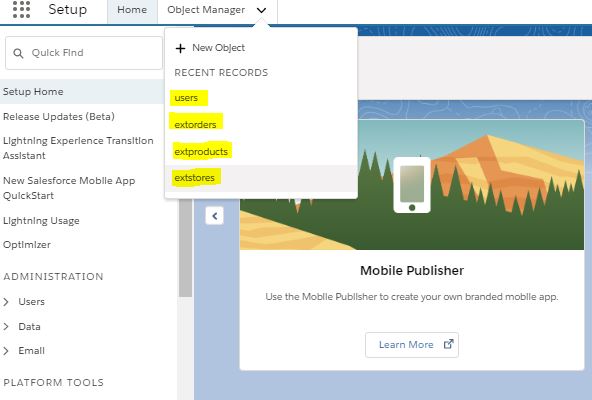
Hooray! We're done and the end result is even sweeter than you expected.

  • Play around with these objects and configure them according to your needs.

  • Create custom tabs to view external data.

  • Use your tabs to read, write, update and delete data directly from Salesforce Organization to your database.

  • Perform full CRUD operations from Salesforce to your external database.

  • Use these objects to feed data to your reports and decorate your dashboards to give useful business insights.

  • Data from your database will directly populate your dashboards in real-time.

To perform CRUD operations on your database, try creating a custom tab. Follow this trail's View External Data section to create custom tabs.

You can also find a trail on how to prepare reports and dashboards with your data here.

· 3 min read
Ravi Kant Sharma

Browse OData 4.0 Service Using OData Client Node or Postman Client.

Hey there folks!
You must be here for a reason, We know you have created an OData Service with IgniteConnex and now you can't wait to see it in action. well, if you haven't created one yet, learn how to create an OData Service here.

Well, fasten you seat-belts because now we are going to get a live tour of our service. You can either use OData Client node or Postman Client to access your APIs as per your convenience. There will be no changes in the requests no matter which client you use. We will be Postman Client for this tutorial. Open Postman on your system and lets get started.

For this example we will take a table (entity) Users with columns (properties) (ID, FullName, Username) and perform CRUD operations on that table using our OData service. To perform CRUD operations, let's start with a GET call.

note

Replace ServiceRoot with your Service URL in the below example URLs.

Requesting Data

Entity Collections

The call below will fetch us data from Users table.

GET serviceRoot/Users

Individual Entity

The call below call will fetch us data from Users table with specified key(primary key).

GET serviceRoot/Users(1)

Specific Fields

The call below will fetch FullName property from Users table with specified key(primary key).

GET serviceRoot/Users(1)/FullName

Querying Data

$top

The call below will fetch top 5 records.

GET serviceRoot/Users?$top=5

$skip

The call below will skip top 5 records.

GET serviceRoot/Users?$skip=5

$select

The call below will get us FullName and Username for all records.

GET serviceRoot/Users?$select=FullName, Username

$count

The call below will get us all the matching records with @Odata.count property with record count.

GET serviceRoot/Users?$count=true

$orderby

The call below will fetch us all records in ascending order

GET serviceRoot/Users?$orderby= Id

  • $orderby= Id asc (default)
  • $orderby= Id desc

$filter

The call below will fetch records where the filter matches the specified criteria.

GET serviceRoot/Users?$filter=FullName eq 'Ravi'

you can add multiple filters by separating them with 'AND' & 'OR' keywords.

  • Fullname eq 'Ravi' AND Username eq 'Ravi-Kaushish'
  • Fullname eq 'Ravi' OR Username eq 'Ravi-Kaushish'
note

New version of OData Nodes support filter function, will be added here soon

Data Modification

Create a Record

The request below will create a new resource in Users table.

POST serviceRoot/Users

{
"Id": 8,
"FullName": "Ravi Sharma",
"Username": "Ravi-Kaushish"
}
info

Request body must contain the data to POST.

Delete a Record

The call below will delete the record with Id 6 from Users table.

DELETE serviceRoot/Users(6)

danger

The primary key for the matching record must be provided.

Update a Record

PATCH serviceRoot/Users(8)

{
"FullName": "Bijay",
"Username": "Bijay-Shah"
}
caution

The request body must only contain the data that you want to UPDATE.

These are the features our OData Nodes supports in its early version.

While you keep doing magic with our tools, we are here working hard to make things even better for you. Fist Bump

· 3 min read
Ravi Kant Sharma

Introduction

Great news! You can now create an OData 4.0 Service inside Ignite using our Ignite-odata nodes and exchange data with your Salesforce Organization.

To create an OData workflow compatible with Salesforce Connect (External Object Connection), you will need our Ignite-OData and Ignite-sequelize nodes.

In this blog I will walk you on "How to create an OData 4.0 Service in Ignite from scratch" step by step.

Let's dive in and create an OData service from scratch inside of our Ignite platform.

Intercepting Requests

To create an OData service we will need an API endpoint to serve the incoming requests, which we can create using the http-in node.

Go ahead, drag and drop a http-in node and configure it. To make it compatible with incoming OData requests which comprises of dynamic URLs, you need to append a /Root/* or /Serviceroot/* variable to the endpoint. This endpoint will now serve all the incoming get requests matching in Serviceroot/ or Root/.

note

To enable your service to perform upsert operations, you will need to add a few other http-in nodes to support requests with other http verbs (Post, Put, Patch, Delete).

Metadata Model

Going forward you will need to provide a database model for your service to serve incoming metadata requests. This can be achieved by using a function node and setting the msg.model property to a valid model and then adding a wire from http-in node to the function node. See the example below.

var model = {
namespace: "odata",
entityTypes: {
users: {
id: { type: "Edm.Int32", key: true },
fullname: { type: "Edm.String" },
username: { type: "Edm.String" },
},
},
entitySets: {
users: {
entityType: "odata.users",
},
},
};
msg.model = model;
return msg;

OData Magic

Next, drag and drop an OData-in node and connect a wire from the function node to the OData-in node. Great job, we are halfway through now!

Database Operation

Drag and drop an Ignite-Sequelize node and connect a wire from the OData-in node to the Sequelize node. Configure your Sequelize node and provide your database connection variables.

OData Out

Now that we have data, we need to enable our workflow to give us an OData compatible response. In order to do this add an OData-out node to your flow and draw a wire from the Sequelize node to the OData-out node.

Http Response

Once you reach this step, give yourself a pat on the back. Now all you need to do is add an http-response node to send that response back to the client.

Click the "Deploy" button and your shining new OData service workflow is ready. You can use Postman client or OData Client node to test your service.

Now that your service is ready for integration, connect to your salesforce organization to exchange data.